This article provides instructions on how to program actions to a Dry Contact Closure (DCC/CC) device, which serves as a bridge between Enlighted sensors and devices with the Enlighted lighting network. The Contact Closure device is controlled by an Edge device in each building, but the digital inputs for the CC device are provided through Manage.
This article explains the process of configuring specific actions to a Contact Closure device.
Prerequisites:
Make sure you have the following prerequisites/dependencies before proceeding.
Configuring the Contact Closure Device
For installing and configuring the Barix Dry Contact Closure device with an on-prem Manage/EMC when an Enlighted Edge is installed and added to the lighting network, refer to the Configuration Guide for Connecting a Barix Dry Contact Closure with On-Prem Manage/EMC with Edge.
Programming Actions for Contact Closure Inputs
There are different actions that can be programmed for each Contact Closure input based on the Input Condition setting of either On or Off.
- Do Nothing (default configuration): When the Contact Closure is triggered, it takes no action.
- Set all Fixtures to Percentage (1-100%): Users have the ability to adjust the light levels of all fixtures between 1 and 100 percent. Additionally, they can specify whether the fixtures should be turned On or Off indefinitely or for a set duration.
- Set all Fixtures in Manage to Auto Mode: Users can set fixtures to their pre-set profile light levels.
- Set all Fixtures in Switch Group to Auto Mode: Users can set all fixtures for one or more Switch Groups on a floor to their pre-set profile light level. Additionally, they can specify whether the fixtures should be turned On or Off indefinitely.
- Set all Fixtures in Switch Group to a Scene: Users can assign a specific scene to all the fixtures for one or more Switch Groups. This can be based on the Input Condition setting, which can either be On/Off indefinitely or Turn On/Turn Off fixtures for a duration. Additionally, users can choose a scene for the Switch Group from the dropdown list in the Actions column. The assigned scene can also be configured to be active for a set duration.
- Combine the Groups: Users can combine existing Switch Groups to achieve a uniform light level across all fixtures in a multi-purpose room when partitions are removed. To achieve a uniform light level,
- The Switch Groups of individual rooms must belong to the same Switch Type.
- The Switch Groups must have the same Button and Scene configuration templates to ensure seamless lighting behavior.
- By meeting the above requirements for a combined group, any switch can control all of the light fixtures belonging to both groups providing a uniform light level in the multi-purpose room.
- Set Astroclock override inputs for PLC: Overrides all Astro clock inputs that was set for PLCs
Configuring Contact Closure Inputs in Manage
To configure the Contact Closure, follow these steps:
-
Toggle the New User Experience button to access the New UI. If you don't see the toggle button, please reach out to Enlighted Support to enable it for your Manage application.
-
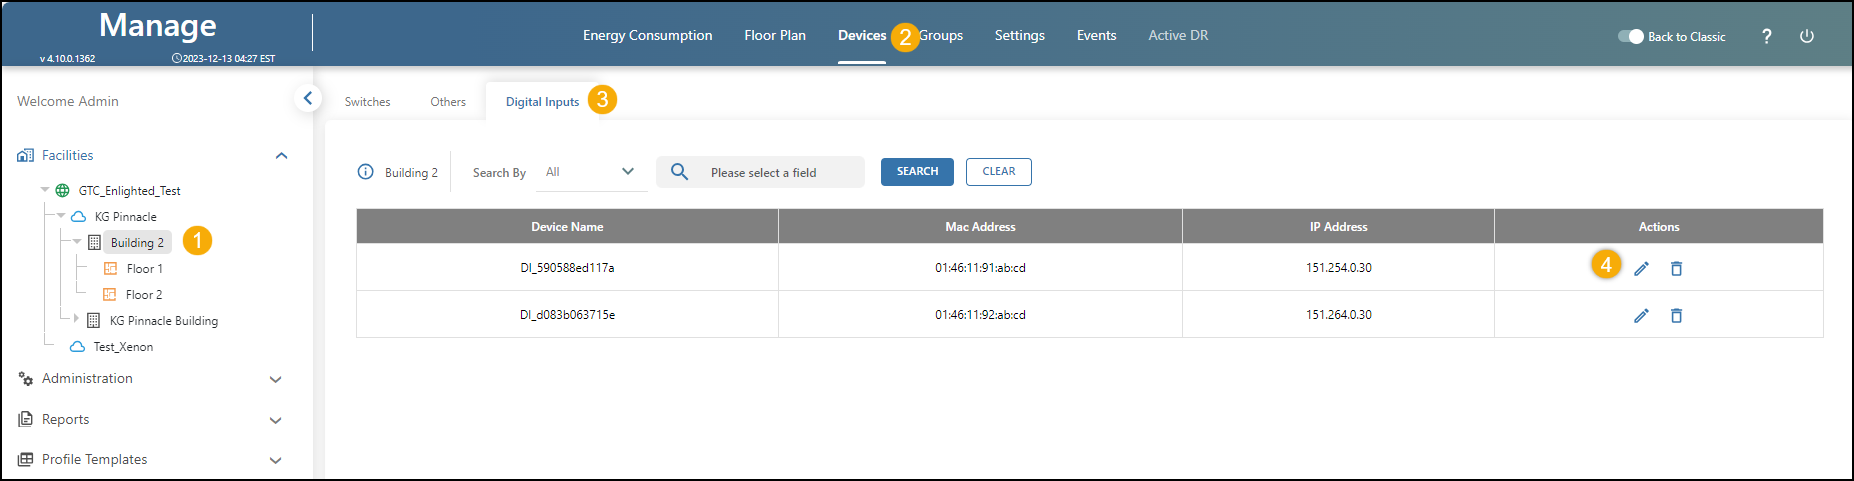
Select the desired Building from the Facilities left panel.
-
Click on Devices.
-
Select the Digital Inputs tab. Ensure that the Contact Closure devices are connected to the same network as Edge. Contact Enlighted Support if Digital Inputs tab or devices do not appear.
-
Click on the Edit icon to modify the actions for the inputs and to program the Contact Closure.
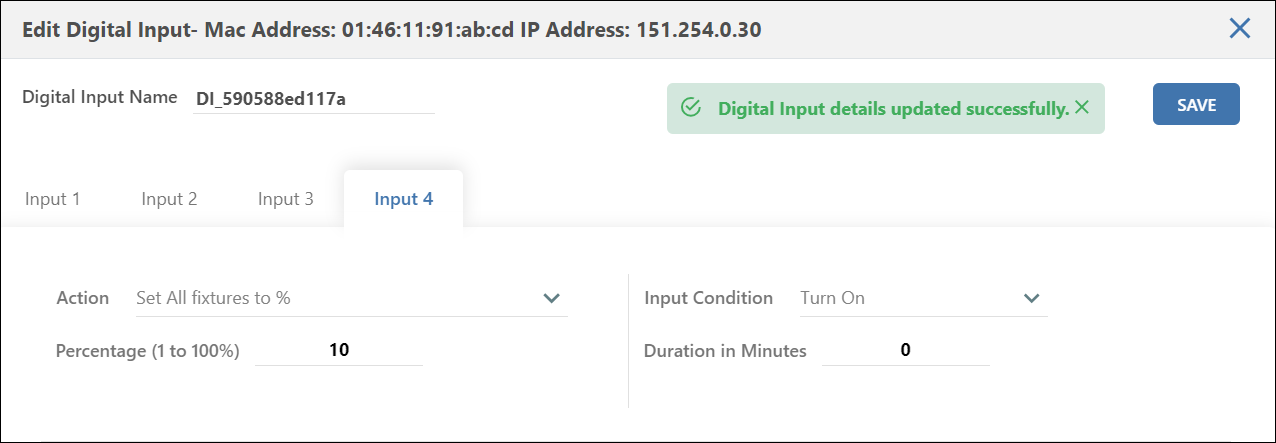
- Edit the Digital Input Name if necessary.
- Select an Input tab and choose an Action from the dropdown list.
- Configure additional parameters based on the chosen action. For example, light levels, input conditions, duration).
- Percentage (1 to 100%): Specify the light levels for fixtures.
- Input Condition:
- On – Turn fixtures on.
- Off – Turn fixtures off.
- Turn On – Turn fixtures on for a set duration.
- Turn Off – Turn fixtures off for a set duration.
- Duration in Minutes: Specify the time the fixtures should be on or off.
Choosing an Action for a Switch Group:
When selecting an action for a Switch Group, choose from the available options. For example,
- Set all fixtures in Switch Group to Auto mode, or
- Set all fixtures in Switch Group to Scene, or
- Combine the groups.
Select one or more Switch Groups from the Switch Groups table. The selected Switch Groups will be listed in the right column.
- Save the configurations for each input.
- Repeat the process for all four inputs of the Contact Closure device. By following the above steps, you have successfully programmed the Contact Closure device.
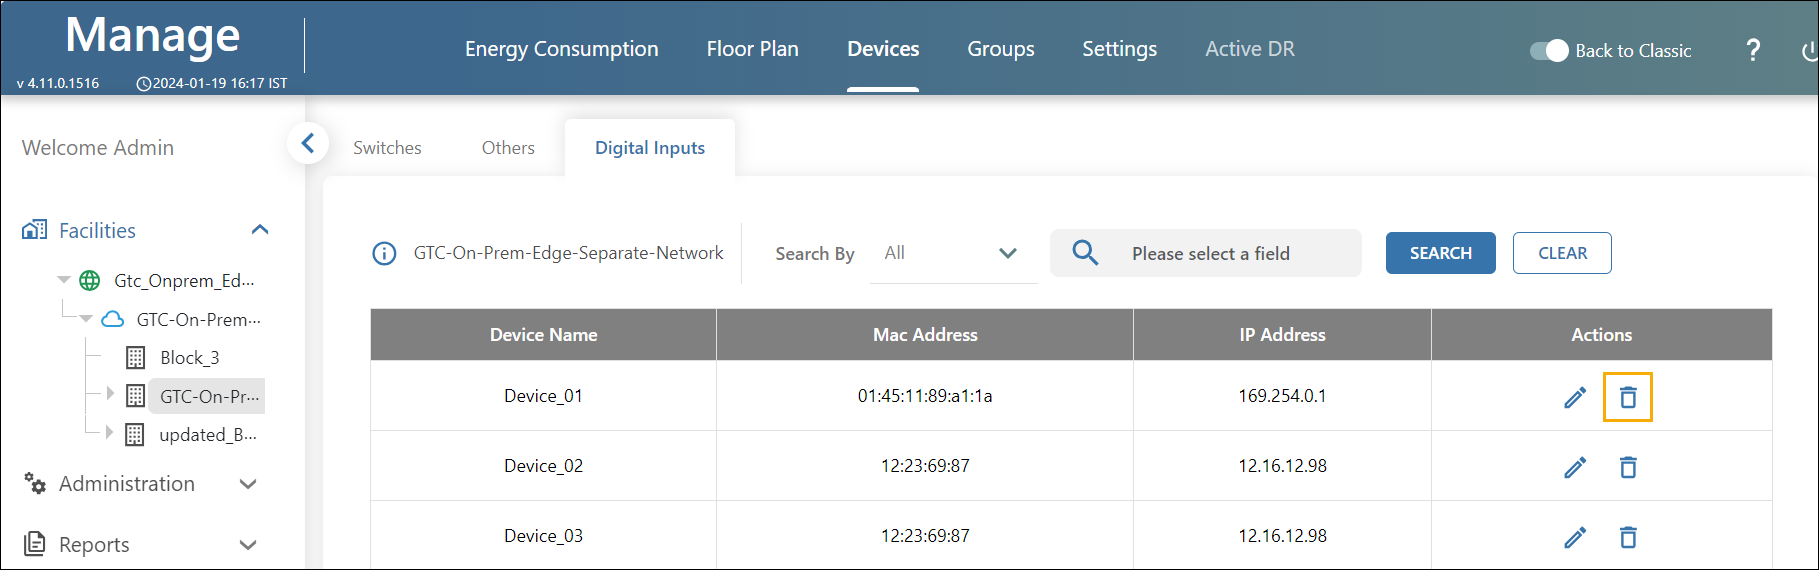
Deleting Contact Closure Devices
- Select the desired Building from the Facilities left panel.
- Click on Devices.
- Select the Digital Inputs tab.
- From the list of devices, click the Delete icon next to the device to be removed. Confirm to continue with deleting the device. The device will be removed from Manage.