Overview
This article provides step-by-step instructions on how to create a Switch Group using the ERC or third-party switches. The ERC switch, when paired with the Enlighted sensor network, allows you to control a group of fixtures and scenes. By associating up to four Enlighted Room Controllers (ERCs) or EnOcean physical switches with a virtual switch, you can adjust the light level of the fixtures in the group.
Note: To create Switch Groups that span Gateways across the floor, see Cross-Gateway Switch Groups (Single Floor).
Prerequisites
- To ensure consistency within a Switch Group, apply the same Scene and Button templates to all the switches in the group. If you need to create new templates, have them prepared before creating the Switch Groups to easily select them.
- Switches, including those from third-party vendors, communicate with the sensors via Bluetooth. After creating a Switch Group, enable SCAN mode for three sensors close to the Gateway to ensure proper communication between the switches and sensors for an ERC switch. For more information on enabling the SCAN mode, refer to the article on how to Set Bluetooth (BLE) Mode.
Things to know:
- Each sensor can be associated with a maximum of ten groups. These groups can include up to five Switch Groups and Cross-Gateway Switch Groups, up to five Motion Groups and Cross-Gateway Motion Groups, and one Daylight Group.
- A Switch Group can have a maximum of four switches.
- A Switch Group created on one floor cannot be moved to another floor.
- A Switch Group includes various devices like Sensors, Plugloads, EnOcean, and ERC switches. You can select as many sensors as needed, as there is no maximum limit.
- A Switch cannot be added to multiple Switch Groups
- Gen 4 sensors are incompatible with EnOcean switches
- The Switch Type within a Switch Group can be configured to be any one of these modes:
Creating a Switch Group
To set up an Enlighted lighting system efficiently, you can use Switch Groups to program switches. By adding sensors to a Switch Group, you can control a group of lights by simply turning the switch on or off.
To create a Switch Group,
Access the New UI using the New User Experience (UI) button in the top bar. In case you don't see the toggle button for the New UI, please reach out to Enlighted Support to enable it for your Manage application.
- Click Facilities in the left navigation pane and select a floor.
- Click on the Groups tab. The Switch, Motion, and Daylight Groups are displayed on the right pane. Additionally, the floor map displays each of the groups with different colors making it easy to identify and locate the groups on the map.
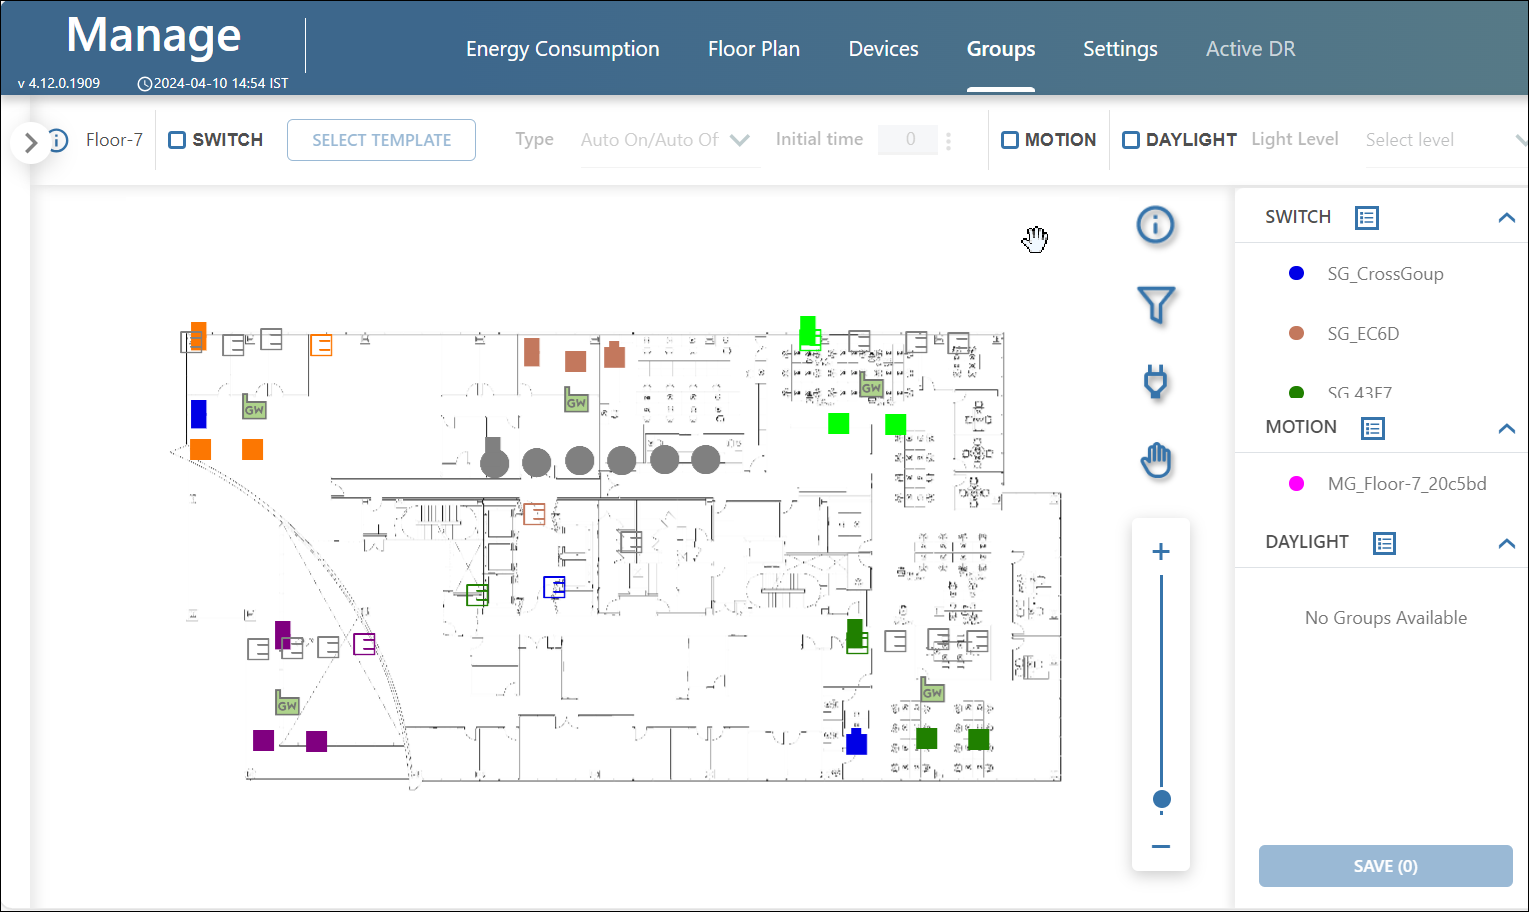
- To select the Gateway associated with the devices, there are two ways you can use:
-
- If you know the Gateway name, click the Gateway filter
 icon; a dropdown list will appear displaying the available Gateways. Select the desired Gateway from the list, and click Apply to view the devices belonging to the Gateway.
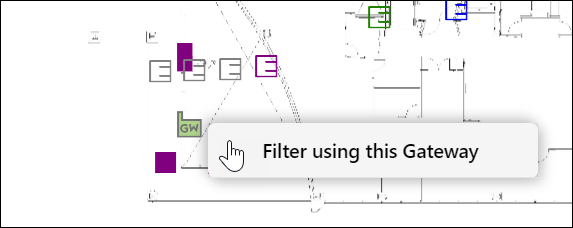
 - If you do not know the Gateway name, right-click on the Gateway in the floor map and select Filter using this Gateway. This will filter the devices and display only the ones belonging to the selected Gateway.
- Select the Switch group check box. The parameters corresponding to the Switch group are highlighted.
Configuring Switch Group Parameters
To select the Switch Group parameters for the selected sensors.
- Select the required Scene Template from the dropdown. For example, if you choose the default Template_20_40_60, three scenes will be applied, with the lights changing from 20% to 40% and 60% when an ERC switch Scene button is pressed. Refer Configure Scenes for additional information.
- Select the required Button Template from the drop-down menu. For example, in a conference room where brighter light is needed when someone enters the room and presses the light switch, you can customize a short press on button 1 to turn lights on to maximum scene level. Refer Configure Buttons for additional details.
- Select the appropriate Switch Type,
- Enter the Initial Time. The Initial Time will determine the time the sensor takes to transition from Manual or Auto mode.
For example, suppose the initial time is set to zero. In that case, the sensor will transition to Auto-off after a period determined by the Active motion window plus Extension period. This equals 2 times the Active Motion Window. If the Initial Time has a non-zero value, then the time taken to transition to Auto-off will be the Initial time plus the Active Motion Window (extension time). If the sensor detects motion during the extension time; it will transition to Auto-off after an additional extension time (Active Motion Window time) starting from the moment the motion was detected. - To Recall the Lighting Scene Color for Tunable White fixtures before the lights were turned off, click the three ellipses dots next to the Initial Time and choose an option.
-
- On-Off Sticky Color – Configures the fixture to recall the last scene color temperature when the fixture is turned back on.
- Override Sticky Color – Configures the fixture to recall the last scene color temperature after the Override period is expired. Please note that the Override period is 60 minutes for any manual adjustments to a fixture's light or color profile settings. Refer to the Override Light Levels/Color Temporarily for a description of temporarily overriding the light profile settings.
For additional information on how to configure and recall the lighting scene, refer to Configure Recall the Lighting Scene Color.

Select Sensors
- Hold the Ctrl key, click and drag a rectangle to select the devices in the area, or hold the Ctrl key and individually select the devices to be grouped. A single sensor can be associated with up to five groups. Select as many sensors as needed, as there is no maximum limit.
- Once you have selected all the devices you want to include in the Switch Group, release the Ctrl key.
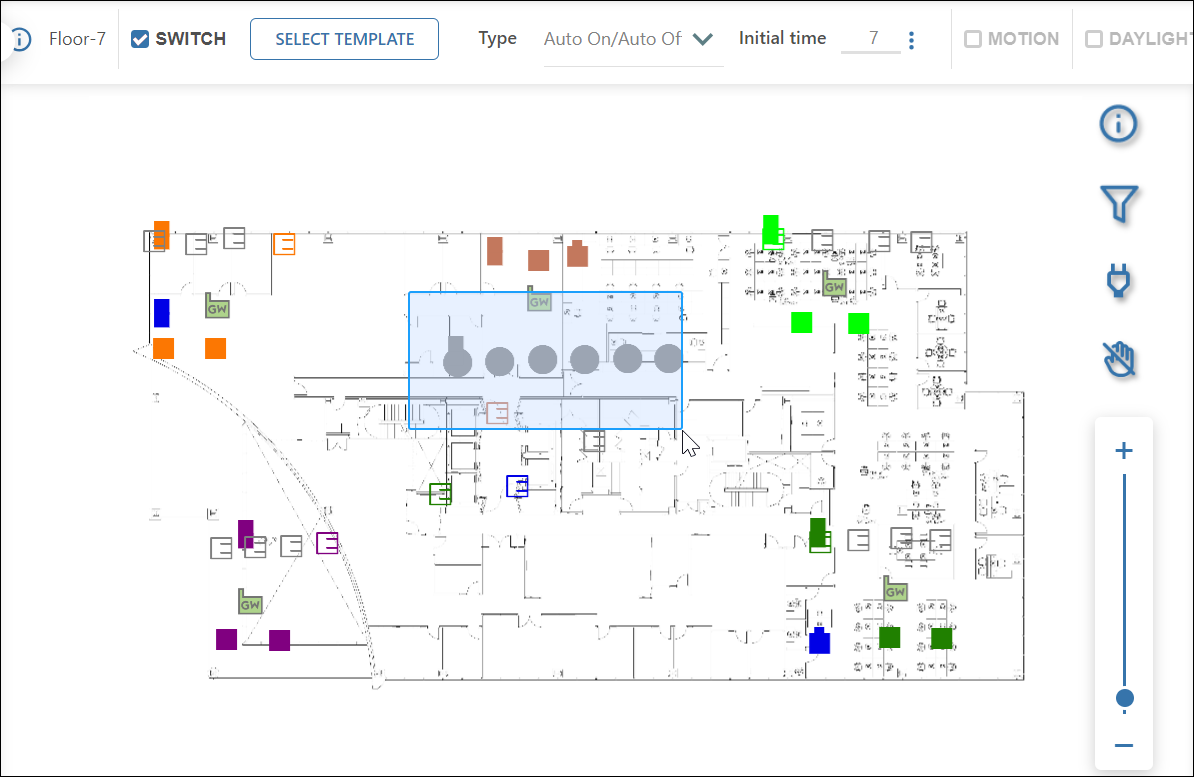
Note: If you are an iOS user, use the cmd key instead of the Ctrl key.
Confirm and Save the Switch Group
- Verify the selected Switch Group parameters and make any final updates if needed. The newly added Group is added and identified with a '+' symbol preceding the system-generated Switch Group name in the right pane.
- Click Save to save the Switch Group.
TIP: If you wish to discard the newly added Switch Group without saving it, you can simply refresh the page. Please note that refreshing the page does not save the newly created Group.

