Overview
Multi-floor Switch Groups maintain uniform lighting levels across multiple floors in a building. This is useful feature for customers who need uniformity in lighting levels throughout their building, saving time and effort in managing lighting levels on different floors individually. To create a Multi-floor Switch Group, users first create Cross-Gateway Switch Groups, and then combine them together to form a Multi-floor Switch Group.
For example, if floor 1 in a building has a Switch Group (ERC Switch) controlling a few sensors, and floor 2 has another Switch Group (ERC Switch) controlling a separate group of sensors, these Switch Groups can be combined. Pressing a button on one floor's Switch will turn lights on the other floor too. Note that the Switch Groups from different floors must have the same Switch Type, (for example, Manual-on/Auto-off) and have the same Button and Scene configuration templates for a consistent lighting level.
Prerequisites
Access New UI
To access the New UI, follow these steps:
- Locate the New User Experience option in the top right corner.
- Toggle the New User Experience to switch to the New UI.
- If you don't see the toggle button, please reach out to Enlighted Support to enable it for your Manage application.
Create Individual Cross-Gateway Switch Groups on Each Floor
1. Create a Cross-Gateway Switch Group on one floor. See
Cross-Gateway Switch Group for instructions.
2. Create another Cross-Gateway Switch Group on another floor.
3. Ensure the
Button and Scene configuration templates are the same for both Switch Groups, and the Switch Type is also similar. For example, both Switch Types must be Manual-on/Auto-off.
Connect Cross-Gateway Switch Groups to Create a Multi Floor Switch Group
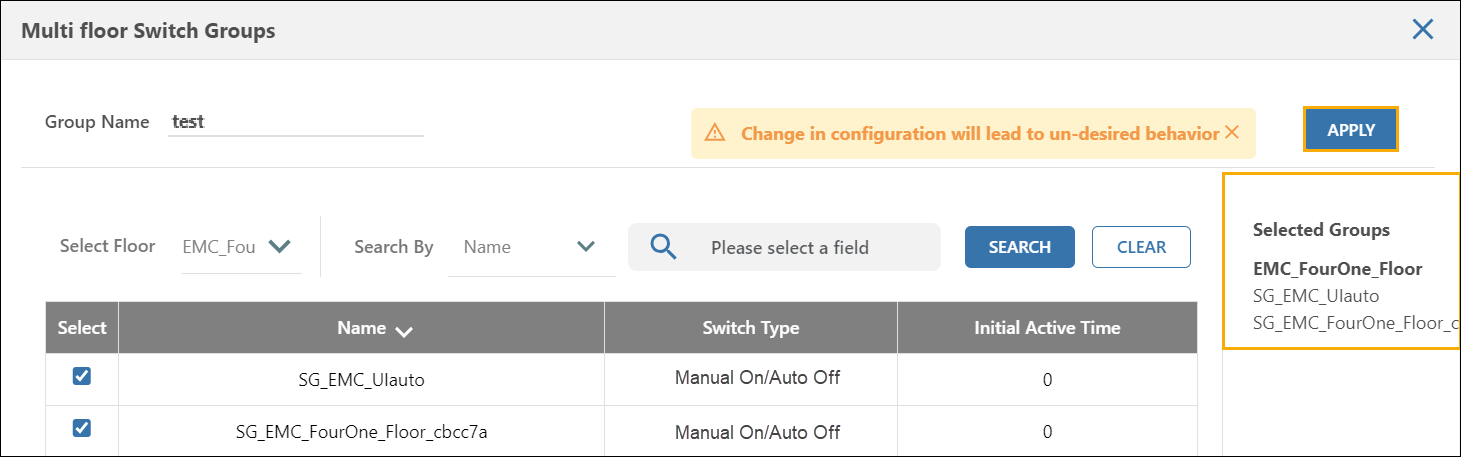
To create a Multi Floor Switch Group, follow these steps:
-
Click on the Facilities option and select a building.
-
Navigate to the Groups tab and select the Multi Floor Switch Groups tab.
-
Click on the Create button.

-
Type a Group Name for the Multi Floor Switch Group. Recommend using a unique name that refers to the building or location to make identification easier.
-
Use the Select Floor dropdown list to choose a floor from the list of floors available in the building.
-
If necessary, you can also search by the Switch Group by selecting Search by Name and typing the name in the search box. Clicking Search will display the Switch groups with the search term.
-
Select the desired Switch Groups on the chosen floor that need to be merged. The selected groups will be displayed in the right-most pane. Please select Switch Groups of the same Switch Type, for example, Manual-on/Auto-off.
-
Repeat Steps 5 to 7 until all the required Switch Groups from each floor are selected.
-
Click Apply to save all the different groups as one Multi Floor Switch Group.
You successfully created Cross-Gateway Switch Groups and combined them to form a Multi-floor Switch Group for providing consistent lighting levels throughout the building.
Test Multi-floor Switch groups by pressing a button on one floor's Switch Group and verify that the sensors on the other floor respond accordingly.
If you experience inconsistent or non-uniform lighting levels when turning on a switch configured for multi-floor, it indicates that the Button and Scenes differ among the individual switches that were grouped together to create the Multi-floor Switch Group.
Refer to Scene templates and Button Templates
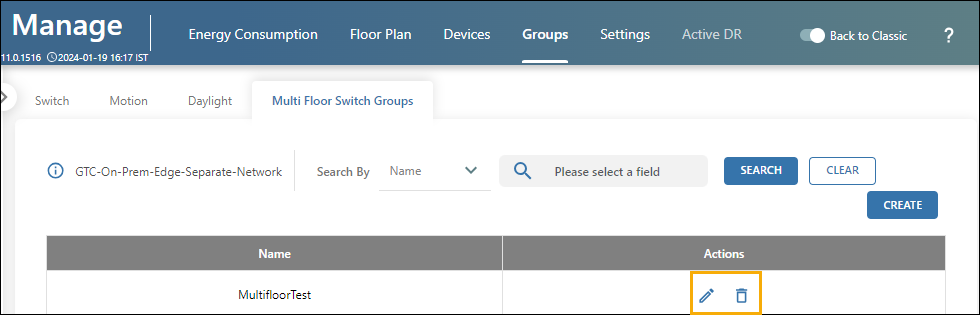
Editing or Deleting a Multi Floor Switch Group
- Click on the Facilities option and select a building.
- Navigate to the Groups tab and select the Multi Floor Switch Groups tab.
- From the Groups tab, select a Multi Floor Switch Group.
- To edit a group, click Edit. Make changes in the Edit Multi Floor Switch Group pop-up and click Apply to save edits.
- To delete a group, click on the Delete icon for the group you wish. Confirm the deletion to proceed.