To access the New UI, toggle the New User Experience button. In case you don't see the toggle button to switch between the New UI and Classic UI, please reach out to Enlighted Support to enable it for your Manage application.
The Enlighted Room Control (ERC), a battery-operated switch, can be paired with the Enlighted sensor network to control a group of fixtures and scenes. The physical ERC is usually mounted on the wall near an entry or exit door. Up to four such Enlighted Room Controllers (ERCs) can be associated with a virtual switch group in Manage to control the fixtures' light levels.
Prerequisites
- Make a note of the Gateway for the targeted sensors that need to be controlled by the switch to turn lights on or off.
Note: To check which Gateway is associated with the sensors, toggle to the Classic UI, select the Devices > Sensors tab to see the Gateway associated with the sensors displayed in the Gateway column, or refer to the article Viewing the Gateway associated with Sensors to view it in the floor plan.
Caution: During the commissioning process, if the ERC switch takes longer to respond, you can end the commissioning process by following the steps in Force Exit Commission.
Adding an ERC Switch
To add a physical ERC Switch to Manage,
Note: The switch should be reset when commissioning for the first time. To reset, press buttons 1, 3, and 4 at the same time until the green LED flashes, followed by a single red blink. This indicates that the ERC is ready for commissioning.
- Select a Floor from the Facilities left panel.
- Click Devices
- Select Switches.
- Select the ERCs tab.
- Click the Add button.

The Add action discovers and commissions the ERC.
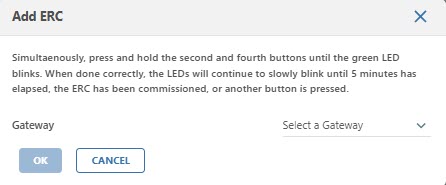
- Select the Gateway (GW) to communicate with the ERC. The fixtures or sensors to be controlled must be bound to the same Gateway as the ERC.
- Click the OK button.
Note: Make sure to select the correct Gateway from the dropdown list and click Start Discovery.
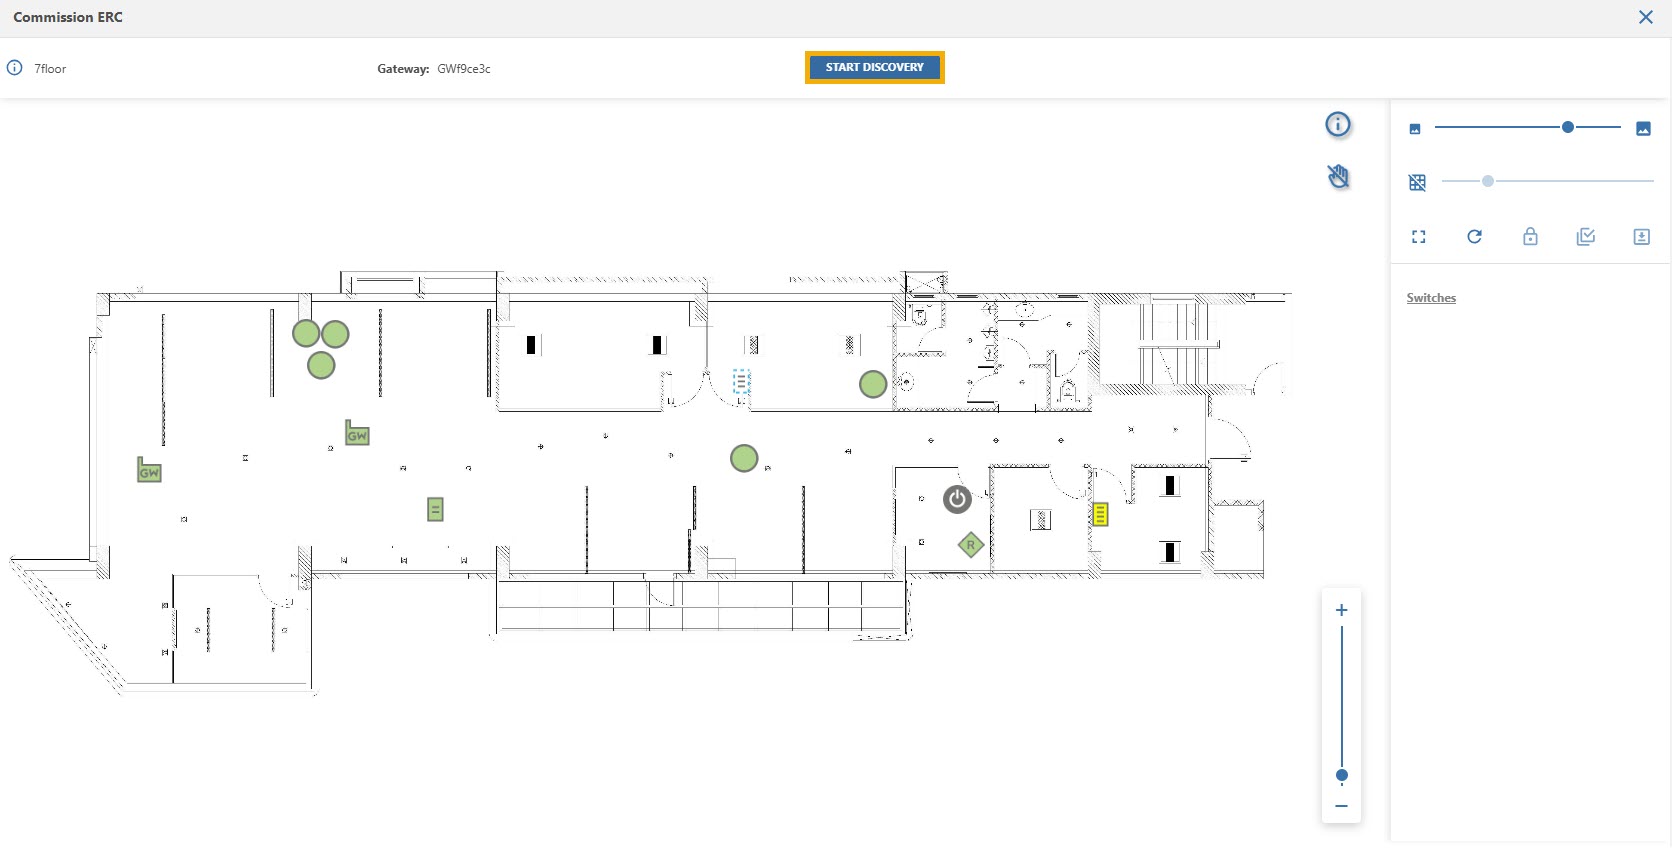
The starting Commissioning Process message is displayed. The Start Discovery button is then activated. Click the Start Discovery button to start the discovery process.
To discover the ERC, set the switch in discovery mode by pressing 2, 4 buttons for a few seconds until the green LED blinks.

A message will indicate that the ERC Discovery is in progress.

If the ERC is not found within a minute, the message "Discovery timed out" is displayed, and the Start Discovery button is automatically reactivated.
If the ERC is found, it is shown in the list of discovered ERCs in the right panel with the message "ERC Discovered."
Select the ERC from the list, place the cursor on the floor plan location where you want to place the switch and perform a right-click action. The Commission and Place menu appears next to the cursor.
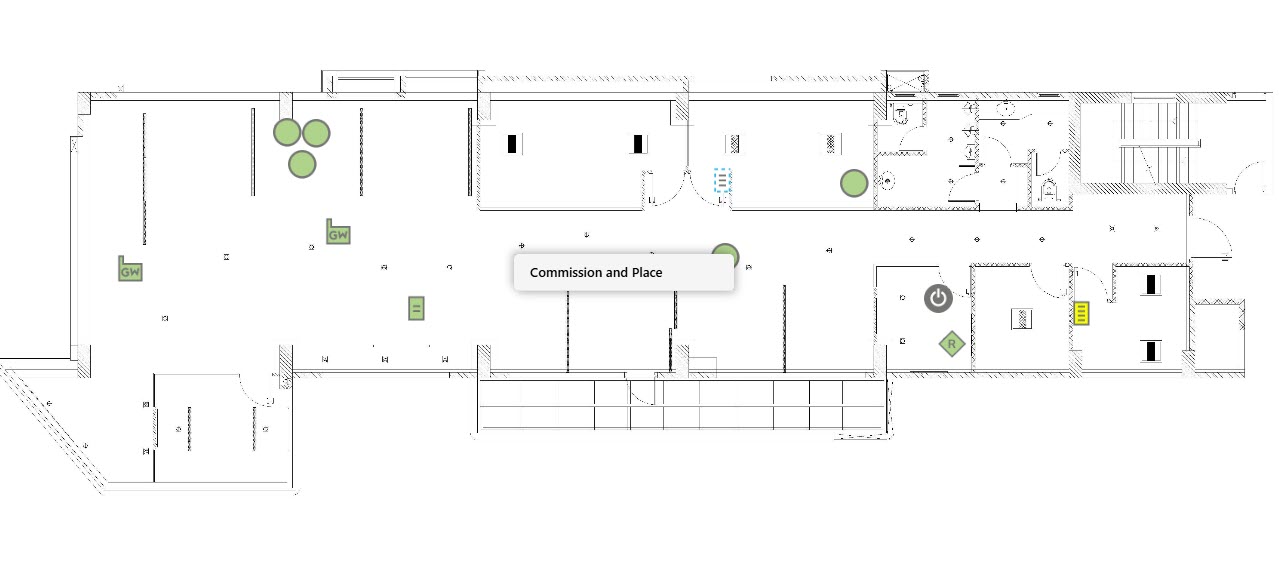
Select Commission and Place. The ERC switch icon will be displayed on the floor plan after the commissioning is finished. ERC Commissioned successfully is shown when the commissioning is successful.
You can select the switch icon and move it to adjust the location if required. To perform this action, click the Drag and Drop icon in the right pane.
You have now completed the commissioning process of an ERC switch in Manage.
Creating a Switch Group
Once you have added the physical ERC switch to a floor plan in Manage, create a switch group, so it can control a group of sensors to control light levels.
Refer to the article Creating a Switch Group.
Deleting and Editing an ERC Switch
Click the delete option to remove any ERC not belonging to a Switch group. If the switch is part of a switch group, select Groups > Switch, make changes in the Edit Switch Group to remove the switch from the group, and then click the delete option to remove the Switch Group.
To delete the ERC,
- Select a Floor from the Facilities left panel.
- Click on Devices > Switch > ERC tabs.
- Select the ERC that you wish to delete and click the Delete button. Confirm to delete the switch by clicking on OK.
To editing the ERC,
- Select a Floor from the Facilities left panel.
- Click on Devices > Switch > ERC tabs.
- Select the ERC that you wish to edit and click the edit button. make the necessary changes and clicking on OK

Force Exit Commission
If you prompt to refresh or close the window while the discovery or commissioning of an ERC is still in progress, you will not be able to commission any devices furthermore.
Instead, click on the Force Exit Commission option and click Yes to exit an incomplete commissioning process.

The commissioning process is now successfully excited, and the status message will be displayed.

Decommission the ERC
If for any reason you decide to decommission the ERC after it is deployed, press buttons 1, 3, and 4 for five seconds to decommission the ERC. The green LED blinks followed by a single red blink to indicate that the ERC is being decommissioned.
Recommended articles:

